Tips To Spark Blogger Blog SEO With Breadcrumb

Tips To Spark Blogger Blog SEO With Breadcrumb

Breadcrumb plays an important role in adding SEO values to your blogger blog. It is little navigation that appears at the top of a blog post.in this tutorial, I will teach you how to add breadcrumb to the top of a blogger blog post.

Breadcrumb helps a blog to improve its internal linking strategy. Like other methods bloggers are using to improve the internal link count of their blogs- adding related posts widget, using category and label.

You may read:
How To Add a Related Posts To Blogger Blog

To add a breadcrumb to blogger blog, follow the steps below:

Sign-in into blogger dashboard > Edit HTML.

Tips To Spark Blogger Blog SEO With Breadcrumb


Still in the Edit HTML, press ctrl+F to find <div class=’blog-posts hfeed’>
Copy the above and paste it below the <div> tag.

Click the save template.
Refresh your blog and note the breadcrumb at the top of the post.

Tips To Spark Blogger Blog SEO With Breadcrumb3


As you can see from the picture above, the breadcrumb displays Home > Category > Blog post title. By reading the breadcrumb, visitors can easily navigate to a different section of the blog.


Working With Microsoft Word Files- Beginners Guide

Working With Microsoft Word Files- Beginners Guide

In this tutorial, working with Microsoft word files, we shall be looking at how we can create a new document, open an existing document, renaming the document, and even closing Microsoft word.


Opening Microsoft word

The very first step in using Microsoft word is to open/launch it for use.  To open Microsoft word, there are three methods to use:


1)      Desktop

Look for the Microsoft-word icon on the computer screen, and double-click to open it.


2)      Start menu

i.                     Click on the windows start menu button.
ii.                   Select “All Programs”.
iii.                  Select “Microsoft Office”.
iv.                 Select “Microsoft Word”.

3)      Recent

This method can be used to open recently used word documents.  About 30 word documents can be accessed with this method.  Follow the steps below:


                                            I.            Open Microsoft word.
                                          II.            Click on the Microsoft Office button.
                                        III.            Select “Recent”.
                                        IV.            Select word document you want to open.

Create a word document

By creating a new document, I mean saving your document for the first time in the desired folder on your computer.  To create a new word    document, follow the steps below:

creating-microsoft-word-document
creating-Microsoft-word-document


  1. Click on the Microsoft Office button. 
  2. Select one “Save As”. 
  3. In the “Save As” dialogue box, type the name for the document, and also choose the location/destination folder
  4. Select Save


Rename word documents

Renaming a document may sometime be necessary to portray the content or purpose of the document. To rename a word document, first, locate the folder where the file is saved. Follow the steps  below:

        I.            Right-click on the document.
      II.            Select rename from the opened shortcut menu.
    III.            Type a new name in the selected bar.
    IV.            And press Enter key when done.

Close document

For proper computer usage, all opened applications must be properly closed before shutting the computer down. Failure to shutdown correctly may lead to damage or totally losing the document.
In all the Microsoft Office applications, there are many ways to close an application. But in this tutorial, I am going to explain three methods:

        I.            Close button

The close button is on the title bar at the very top of the screen. by clicking on this button, you can close Microsoft word.


Microsoft word close button


      II.            Taskbar

By right-clicking on the minimized button of Microsoft word the taskbar, a menu containing “Close window” is displayed. Click on close.

microsft word logo
Microsft word logo

    III.            Microsoft word logo

This logo is on the left side of the title bar as you can see it below. Just click on the logo, a menu containing Restore, Move, Minimize, Maximize, and Close. Click on close.

microsoft-word-logo
Microsoft-word-logo


These four methods of working with Microsoft word files can also be used with any office application (Excel, Word, Access, and PowerPoint).
Thank you for reading, your comments are welcomed.


How To Create Sitemap Page For Blogger Bog

How To Create Sitemap Page For Blogger Bog

Hi, everyone in this tutorial we are going to create a sitemap for our blogger blog. Creating an HTML sitemap is very simple and can be done very quickly.

A sitemap is a table of content for all the content of your blogger site. As you can see the example above, all the posts are displayed on one page. How would you like all the links to all your site contents are displayed on one page?

You may like:


Why do you need a sitemap for your blog? The answer to this question is having a table of content is like telling Google search engine how your blog articles/contents are arranged into levels and sections. This makes easy for Google bot to crawl the entire blog omitting anyone .secondly; visitors to the blog can easily navigate the entire blog by visiting the sitemap.

As part of the requirement to get accepted into the Google AdSense program, creating a sitemap for a blog is very necessary. Other pages like about us, contact us, privacy policy, and lastly submitting XML sitemap of your blog to Google webmaster tool are created the same way sitemap is created.
The sitemap code is added via HTML, so it is required you have basic knowledge of HTML. But do not be panic, because this tutorial is for beginners like you.

Creating an HTML sitemap is divided into two parts. The first is to create the page and add the link to the navigation menu. While the second is to copy a JavaScript code into the empty page that is created.


1.       Create the HTML page

Login into your Google blogger dashboard.
Select pages> New Page.
Type “Sitemap” as the title of the page.
Leave the content empty for now.
      Add the sitemap link to navigation menu

How To Create Sitemap Page For Blogger Bog


2.       Copy the sitemap code

Now, switch back to the sitemap page you have just created. Change the page content from compose mode to HTML. Copy the JavaScript code below into the page content area, and change URL in the code to your blog URL. Update and refresh the blog.

<div id="bp_toc">
</div>
<script src="http://mybloggerlab.com/js/sitemap.js" type="text/javascript"></script>
<script src="/feeds/posts/summary?alt=json-in-script&amp;max-results=9999&amp;callback=loadtoc" type="text/javascript"></script>

To see the effect on the page, refresh the blog and click the page in the navigation menu. You will see all the posts of the blog on a single page.


I see you excel in blogging. If you have any comment, do not wait to drop it here. Thank you for reading.


Ultimate Guide To Mouse Techniques – Microsoft Word

Ultimate Guide To Mouse Techniques – Microsoft Word

A mouse is one of the important devices that are used to enter data to the computer. It makes human-computer interaction very easy and enjoyable.
As a computer user, you must be proficient in the use of a mouse to make computer usage a good experience. A computer can still be used with only the keyboard, but this is only used by an advanced user. For example, computer engineers can work without a mouse if the mouse input is faulty. They know all the shortcut keys to use in place of a mouse.

This tutorial, ultimate guide to mouse techniques is written for the beginners and intermediate users who want to broaden their knowledge in Microsoft word. With my ten years’ experience as a computer teacher, Microsoft office precisely, I have come to know that many computer users do not know how to use the mouse effectively.

In this lesson, I will be looking into four beginners guide to mouse techniques in Microsoft word. So, sit back and follow the lesson. A quick look at the mouse techniques before we start:

1.Left-click
2.Right-click
3.Double-click
4.Dragging the mouse


Mouse Left-Click and Right-Click


       1.            Left-Click
Clicking the left mouse button once allows you to select any text or object on the screen. This mouse action is only used for selection. For example, to select a Microsoft word icon on the desktop, just click once on the mouse button.

       2.            Right-Click
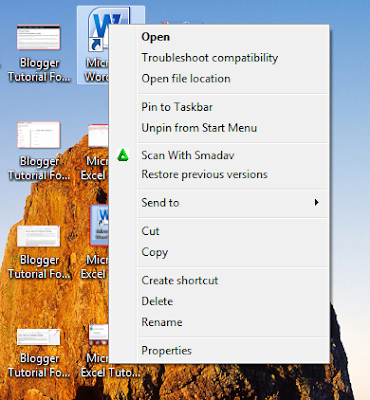
By clicking the right mouse button, you will notice a menu is displayed showing a list of options to choose from. This menu is called a shortcut menu. This menu is used. If you are confused on what to do next, to show actions that can be carried out on what has been selected.

Mouse-Right-Click
Mouse-Right-Click


For example,  if I right-click on Microsoft word icon on the desktop. The shortcut menu for this iron is displayed as shown below. From there, I can now select “Open” from the list. In short, right-click is used to show a shortcut menu.

       3.            Double-click
Clicking the left mouse button twice on any folder or icon will open and displays the content of the folder or icon. Double-click is mainly used to open a folder, and secondly to launch an application.

Microsoft Word Icon
Microsoft Word Icon


       4.            Dragging the mouse
Hold down the left mouse button and move the mouse from the beginning of a text, sentence, and paragraph across to the end of the text. As you move the mouse across the text, it will be selected gradually.
This mouse technique is the best if you are selecting part of a paragraph in Microsoft word document.

Let me know if you are having any problem with this tutorial. You can drop your comments here. I will also try to add a video tutorial on this topic – “Ultimate Guide To Mouse Techniques-Microsoft word” for better understanding. Thank you for reading.


Microsoft Excel Tutorials For Beginners-Introduction


Microsoft Excel Tutorials For Beginners
Microsoft Excel Tutorials For Beginners-Introduction

Hi, once again lovers of this blog. In this tutorial, I will be giving you a step-by-step approach to knowing Microsoft Excel basics.  This is an introductory class for anyone wanting to know how to use Excel effectively.  So, sit back and follow along.

You may read:
Selecting, Editing Cells In Microsoft Excel Worksheet

How To Move Around In Microsoft Excel Worksheet

What is Microsoft Excel
Microsoft Excel is part of Microsoft Office (excel, excel, PowerPoint, access).  It is an electronic spreadsheets application that can be used to organize your data into rows and Columns. Being an automated version of the paper-based spreadsheet, it makes it easier to store, organise, manipulate, and view your data by using basic arithmetic operations (addition, subtraction, division, multiplication) and advanced or complex functions.

Versions of Excel
The very first version of Excel was for Mac OS in 1985, version 2.0.5, and later the Windows version was released on November 1987.  From that period till date, there have been a lot of improvements as new features are being added with every release.

The few of last releases are Excel 2007, 2010, 2013, and the last version 2016.  Starting from Excel 2007, the commands are grouped under a tab and all in a toolbar called ribbon.  Unlike the previous versions (excel 2003) that has its commands in standard, formatting, and menu bars in an unfriendly manner and that makes it hard for beginners to use and learn.

Examples of spreadsheets software
There are many spreadsheets application software in the markets today, but Microsoft Excel has become an industry standard. Excel, being one of Microsoft office, is very easy to learn as compared to other spreadsheet applications.  Anybody that knows how to type with Microsoft Excel can start doing some basic tasks with Excel.

The following are is examples of spreadsheets software:

1.       Lotus 1-2-3
A spreadsheet application personally designed for IBM computers. It was initially released on January 26, 1983, and ran on Ms-Dos and Microsoft windows.

2.       Open Office  Calc
This is an open-source application similar to capabilities of Microsoft Excel.it runs formulas, performs basic arithmetic operations and organize basic information. Because it is free software it runs on almost all operating systems.

3.       Zoho Sheet
This software is best suited for online sharing and collaboration.  Unlike Excel, it is web-based spreadsheets application user needs to be online to use it. It supports importing and exporting of data, runs macro and so on.

4.       Speed 32
This software is used by basic users to perform simple tasks such as busy arithmetic operations. It has the same rows (65,536) and columns (256) as in Excel 2003.  You can download the software for free.

5.       Corel’s QuattroPro
It is part of ExcelPerfect office suite developed by Corel incorporation and Borland. Quattropro uses keyboard, and seminar to lotus 1-2-3. Prior to Excel 2007, the number of Rows and Columns.

6.       Gnumeric
This software file can be exported into Excel. It is run on a Linux operating system.  One advantage of Gnumeric over Excel is that it can handle more complex operations.


7.       Open Office Suite
This is a free office applications suite that can be downloaded at http://www.openoffice.org.  It is used for Excel processing, graphics, databases, and spreadsheets, presentations, and other common tasks on the computer.  Openoffice is an alternative to Microsoft Excel, the spreadsheet application capabilities is also the same as that excel spreadsheets.


Microsoft Excel Screen


Microsoft Excel Tutorials For Beginners1
Microsoft Excel Window


It has been stated in the previous paragraph that Excel and the use to organize your data into rows and columns.  You can also use it to perform mathematical calculations quickly. This lesson will introduce you to the excel screen/window.  The window is used to interact with Microsoft excel.
To begin this lesson, I am going to show you three methods of opening Microsoft Excel, namely:

1.       Through the desktop
If you see Microsoft Excel's  Icon that looks like the one below, double click on this icon to open Microsoft Excel.


2.       Through the start menu(or Start button)
If the Excel icon cannot be found on the desktop, the next option is to use the start menu by following these steps:
a)      Click on the start button
b)      Select all programs
c)       Select Microsoft office
d)      Select Microsoft Excel


Microsoft Excel Tutorials For Beginners3


3.       Through the recent document
This method is very handy if you want to open previously used Microsoft Excel documents. You want to work on a particular document and want to open it by its name, quickly to the recent document and you will see the list of up to 30 previously opened Microsoft Excel document.

To use this method, follow these steps:
a)      Open Microsoft Excel using any of the two methods mentioned above
b)      Select the File tab
c)       Select Recent
d)      Select the Excel document you want to open

The Microsoft Office button
In the upper left corner of the Excel 2007 window in the Microsoft Office button.  When you click the button, a menu appears.  You can use the menu to create a new file, open an existing file, and perform any other tasks.

The Quick Access Toolbar


Microsoft Excel Tutorials For Beginners4

This toolbar is next to the Microsoft Office button.  The quick access toolbar gives you with commands you frequently use.  By default, SAVE, UNDO, REDO appears on the quick access toolbar.  You can use it to save your file, Undo to roll back an action you have taken and Redo to reapply an action you have rolled back.


The Title Bar
Next to the quick access toolbar is the title bar.  On the title bar, Microsoft Excel displayed the name of the workbook you are currently using.  At the top of the Excel window, you will see “Microsoft Excel-Book1.” That is the title of the excel document.

The Ribbon
Use commands to tell Microsoft Excel what to do. In Microsoft Excel 2007, you use the ribbon to issue commands. The ribbon is located near the top of the Excel window, below the quick access toolbar. At the top of the ribbon are several tabs; clicking a tab displays related commands groups. 

      Within each group are related command button. You click the button to issue commands or to access menus and dialogue box launcher, a dialogue box makes additional commands available.

The Formula Bar
If the formula bar is turned on, the cell address of the cell you are in is displayed in the Name box which is located on the left side of the formula bar. Cell entries display on the right side of the formula bar. If you do not see the formula bar in your window, perform the following steps:
1.       Choose the view taps
2.       Click Formula bar in the show/Hide group. The formula bar appears.

  The Excel worksheet
Microsoft Excel consists of worksheets. Each worksheet contains columns and rows. The columns are lettered A to Z and then  continuing with AA,AB,AC and so on; the rows are numbered from 1 to 1,048,576. The number of the columns and rows you can have in a worksheet is limited by your computer memory and your system resources.

What is a cell: A cell is an intersection of row and column. A rectangular box shows where the column and row meet.

The combination of a column coordinate and a row co-ordinate make up a cell address. For example, the cell located in the upper-left corner of the worksheet is cell A1,meaning column A, row 1. Cell E10 is located under column E on row 10. You enter your data into the cells on the worksheet.


The status Bar
The status bar appears at the very bottom of the Excel window and provides such information as the sum, average, minimum, maximum value of selected numbers. You can change what displays on the status bar and selecting the options you want from the customise status bar menu. You click menu item to select it. You click it again to deselect it. A check mark next to an item means the item is selected.


Blogger Tutorial For Blogger-How To Add Related Post

How-to-add-related-post-in-blogger
Related Posts In Google Blogger

Why should I add a related post to my blog and does it add value to my blogger blog? That is the question many people asked me, but in this tutorial for beginners, I am going to show you a step-by-step method of adding a related post to your blogger blog.

A related post, as the name implies, shows posts that are related to the current post you are viewing when on any Google blogger blog. In other words, it displayed the posts that are in the same Category/Label below the current post being viewed. To answer the question my visitors usually asked me.

A related post adds to the internal linking structure of a blog, one of the important SEO metrics Google to determine the relevance of your blog posts – how related posts are interlinked to one another. Another advantage of adding a related post is that it allows the visitor to quickly search for related posts that might be of importance to them.

Now back to the real work – how to add a related post with a thumbnail image. As you can see in the image, there are 5 posts that are related to the current post being displayed. To see the effect of the related post in your blog, make sure you have at least two posts in the same Category/Label. I would prefer you have six posts. Secondly, all posts must have an image so that the thumbnails for the posts can be displayed.


To add a related post at the bottom of a post, follow the steps given below:

Step one: Edit the Blog's HTML  by adding CSS to the head section

In the blogger dashboard, select Template > HTML to see HTML/XML code of your blog as shown below. Find  </head> tag in the code by pressing Ctrl + F  and type the header tag in the search bar displayed and press the enter key.

How-to-add-related-post-in-blogger

Copy-paste the below code above the </head> tag. This code is the CSS for the related post.

 <!--Related Posts with thumbnails Scripts and Styles Start-->  
 <b:if cond='data:blog.pageType == &quot;item&quot;'>  
 <style type='text/css'>  
 #related-posts {   
   float:left;  
   width:auto;   
 }  
 #related-posts h2 {   
   margin-top: 10px;  
   background:none;padding:3px;   
 }  
 #related-posts .related_img {   
   margin:5px;  
   border:4px solid #f2f2f2;  
   width:105px;height:105px;  
   transition:all 300ms ease-in-out;  
   -webkit-transition:all 300ms ease-in-out;  
   -moz-transition:all 300ms ease-in-out;  
   -o-transition:all 300ms ease-in-out;  
   -ms-transition:all 300ms ease-in-out;   
 }  
 #related-title {  
   color: #222;  
   line-height: 16px;  
   padding: 0 10px;  
   text-align: center;  
   text-shadow: 0 2px 2px #fff;  
   width: 100px;  
 }  
 #related-posts .related_img:hover{   
   opacity:.7;  
   filter:alpha(opacity=70);  
   -moz-opacity:.7;  
   -khtml-opacity:.7  
 }  
 #related-title:hover {   
   text-decoration: underline;   
 }  
 </style>  
 <script type='text/javascript'>  
 //<![CDATA[  
 imgr=new Array();imgr[0]="https://blogger.googleusercontent.com/img/b/R29vZ2xl/AVvXsEj31muk1R5yD3oHs2YqzAXYDzJn548D8xcMuIuzgjsFcm39mHAPyPWwUWClOL2IR5ixiR_a2RYezQWhUxTheyx9NHEa53Dj07G-GRI09fqPSgY27Ay3zPOiGHrbvgtkem1RfVq3S8pMYOKF/s1600/no-thumbnail.png";showRandomImg=true;aBold=true;summaryPost=400;summaryTitle=20;numposts1=12;numposts2=4;function removeHtmlTag(strx,chop){var s=strx.split("<");for(var i=0;i<s.length;i++){if(s[i].indexOf(">")!=-1){s[i]=s[i].substring(s[i].indexOf(">")+1,s[i].length)}}s=s.join("");s=s.substring(0,chop-1);return s}  
  function showrecentposts1(json){j=(showRandomImg)?Math.floor((imgr.length+1)*Math.random()):0;img=new Array();if(numposts2<=json.feed.entry.length){maxpost=numposts2}else{maxpost=json.feed.entry.length}for(var i=0;i<maxpost;i++){var entry=json.feed.entry[i];var posttitle=entry.title.$t;var pcm;var posturl;if(i==json.feed.entry.length)break;for(var k=0;k<entry.link.length;k++){if(entry.link[k].rel=='alternate'){posturl=entry.link[k].href;break}}for(var k=0;k<entry.link.length;k++){if(entry.link[k].rel=='replies'&&entry.link[k].type=='text/html'){pcm=entry.link[k].title.split(" ")[0];break}}if("content"in entry){var postcontent=entry.content.$t}else if("summary"in entry){var postcontent=entry.summary.$t}else var postcontent="";postdate=entry.published.$t;if(j>imgr.length-1)j=0;img[i]=imgr[j];s=postcontent;a=s.indexOf("<img");b=s.indexOf("src=\"",a);c=s.indexOf("\"",b+5);d=s.substr(b+5,c-b-5);if((a!=-1)&&(b!=-1)&&(c!=-1)&&(d!=""))img[i]=d;var month=[1,2,3,4,5,6,7,8,9,10,11,12];var month2=["Jan","Feb","Mar","Apr","May","Jun","Jul","Aug","Sep","Oct","Nov","Dec"];var day=postdate.split("-")[2].substring(0,2);var m=postdate.split("-")[1];var y=postdate.split("-")[0];for(var u2=0;u2<month.length;u2++){if(parseInt(m)==month[u2]){m=month2[u2];break}}var daystr=day+' '+m+' '+y;pcm='<a href="'+posturl+'">'+pcm+' comments</a>';var trtd='<div class="col_maskolis"><h2 class="posttitle"><a href="'+posturl+'">'+posttitle+'</a></h2><a href="'+posturl+'"><img class="related_img" src="'+img[i]+'"/></a><div class="clear"></div></div>';document.write(trtd);j++}}var relatedTitles=new Array();var relatedTitlesNum=0;var relatedUrls=new Array();var thumburl=new Array();function related_results_labels_thumbs(json){for(var i=0;i<json.feed.entry.length;i++){var entry=json.feed.entry[i];relatedTitles[relatedTitlesNum]=entry.title.$t;try{thumburl[relatedTitlesNum]=entry.gform_foot.url}catch(error){s=entry.content.$t;a=s.indexOf("<img");b=s.indexOf("src=\"",a);c=s.indexOf("\"",b+5);d=s.substr(b+5,c-b-5);if((a!=-1)&&(b!=-1)&&(c!=-1)&&(d!="")){thumburl[relatedTitlesNum]=d}else thumburl[relatedTitlesNum]='https://blogger.googleusercontent.com/img/b/R29vZ2xl/AVvXsEj31muk1R5yD3oHs2YqzAXYDzJn548D8xcMuIuzgjsFcm39mHAPyPWwUWClOL2IR5ixiR_a2RYezQWhUxTheyx9NHEa53Dj07G-GRI09fqPSgY27Ay3zPOiGHrbvgtkem1RfVq3S8pMYOKF/s1600/no-thumbnail.png'}for(var k=0;k<entry.link.length;k++){if(entry.link[k].rel=='alternate'){relatedUrls[relatedTitlesNum]=entry.link[k].href;relatedTitlesNum++}}}}function removeRelatedDuplicates_thumbs(){var tmp=new Array(0);var tmp2=new Array(0);var tmp3=new Array(0);for(var i=0;i<relatedUrls.length;i++){if(!contains_thumbs(tmp,relatedUrls[i])){tmp.length+=1;tmp[tmp.length-1]=relatedUrls[i];tmp2.length+=1;tmp3.length+=1;tmp2[tmp2.length-1]=relatedTitles[i];tmp3[tmp3.length-1]=thumburl[i]}}relatedTitles=tmp2;relatedUrls=tmp;thumburl=tmp3}function contains_thumbs(a,e){for(var j=0;j<a.length;j++)if(a[j]==e)return true;return false}function printRelatedLabels_thumbs(){for(var i=0;i<relatedUrls.length;i++){if((relatedUrls[i]==currentposturl)||(!(relatedTitles[i]))){relatedUrls.splice(i,1);relatedTitles.splice(i,1);thumburl.splice(i,1);i--}}var r=Math.floor((relatedTitles.length-1)*Math.random());var i=0;if(relatedTitles.length>0)document.write('<h2>'+relatedpoststitle+'</h2>');document.write('<div style="clear: both;"/>');while(i<relatedTitles.length&&i<20&&i<maxresults){document.write('<a style="text-decoration:none;margin:0 4px 10px 0;float:left;');if(i!=0)document.write('"');else document.write('"');document.write(' href="'+relatedUrls[r]+'"><img class="related_img" src="'+thumburl[r]+'"/><br/><div id="related-title">'+relatedTitles[r]+'</div></a>');if(r<relatedTitles.length-1){r++}else{r=0}i++}document.write('</div>');relatedUrls.splice(0,relatedUrls.length);thumburl.splice(0,thumburl.length);relatedTitles.splice(0,relatedTitles.length)}  
 //]]>  
 </script>  
 </b:if>  
 <!--Related Posts with thumbnails Scripts and Styles End-->  


Step two: Add the code for the related post


 <!-- Related Posts with Thumbnails Code Start-->  
 <b:if cond='data:blog.pageType == &quot;item&quot;'>  
   <div id='related-posts'>  
     <b:loop values='data:post.labels' var='label'>  
       <b:if cond='data:label.isLast != &quot;true&quot;'>  
     </b:if>  
     <b:if cond='data:blog.pageType == &quot;item&quot;'>  
     <script expr:src='&quot;/feeds/posts/default/-/&quot; + data:label.name + &quot;?alt=json-in-script&amp;callback=related_results_labels_thumbs&amp;max-results=6&quot;' type='text/javascript'/></b:if></b:loop>  
     <script type='text/javascript'>  
       var currentposturl=&quot;<data:post.url/>&quot;;  
       var maxresults=6;  
       var relatedpoststitle=&quot;<b>Related Posts:</b>&quot;;  
       removeRelatedDuplicates_thumbs();  
       printRelatedLabels_thumbs();  
     </script>  
   </div>  
 </b:if>  
 <!-- Related Posts with Thumbnails Code End-->  


With the same method used in step one, find this tag <div class= ‘comments’ id= ‘comments’>. Copy-paste the below code above the <div class= ‘comments’ id= ‘comments’> tag. In most cases, there are two instances of this <div class= ‘comments’ …..> tag in Google blogger blog. Paste the code above the one and save your blog, if nothing changes then erase the code above the instance of the tag and place the code on the second tag and press save.

In my own case, the second <div class= ‘comments’ …..> tag worked and all related posts rendered nicely. You can as well play with the CSS file you have just copied to the head section, but only if you know what you are doing. Fill free and enjoy yourself by following the steps in this tutorial. Share your comment/opinion about this post – How To Add Related Post. Thank you for reading.


Blogger Tutorial For Beginners – How To Add Page

Blogger Tutorial For Beginners – How To Add Page

Hi everyone, in this tutorial how to create /add page in Google blogger blog, I am going to show you every step on how to do that. Why do we need pages on blogger? Is it necessary? That is the question most of my fans asked me when they are starting a new Google blogger blog. 

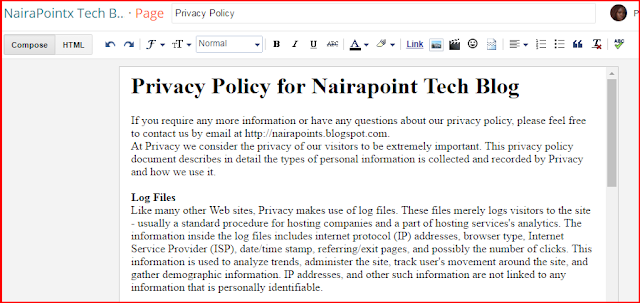
I am here to give the answer to this question, and carefully explain the steps you will follow to create all the important pages yourself. Pages are static contents you add to your blog that tells people who you are, what your blog is all about, your contact information, and privacy policy. 

There are many pages you can create on blogger blog, pages like About Us, Contact Us, Site Map, Privacy Policy, etc. These pages are necessary especially when you want to join some affiliate or ads network like Google AdSense.

To get accepted into Google AdSense, you must add About Us, Contact Us, and Privacy Policy pages. This is because Google wants serious people and people with an identity. By having these pages on your site, a visitor to your site can contact you and also get information about your company/blog site.

To create a new page on your blog, please follow the steps below
:
Step one:

Blogger Tutorial For Beginners – How To Add Page1

Log in to blogger account at www.blogger.com and select the blog you want to create a page for.
In blogger dashboard, select pages > New Page. A new page editor is opened – Same as post page. In this blogger tutorial for beginners, I want to add an ‘About Us’ page. So in the title bar just type “About Us”.

Step two:

Blogger Tutorial For Beginners – How To Add Page2


Next, click on the content area and type anything about yourself and your company/blog site. But in this tutorial, I am going to use a temporary content from www.html-ipsum.com and copy-paste the content as can be seen in the image below.

Step three:

Blogger Tutorial For Beginners – How To Add Page3


Click on publish button to save and update the page. The “About Us” page is now ready to be view. Copy the URL of the page you have just created, and switch back to Layout and update the navigation menu with new pages link so that your site visitors can access your page from the home page.


This process can be used to create other pages like Contact Us page, Site Map page, Privacy Policy, etc. I am very sure with this tutorial – Blogger Tutorial For Beginners-How To Add Page, you should be able add other types of pages. Please, fill free to share your opinion and comment on this post. Thank you.